Firemaw
Last updated: 7/21/26
Finally, a real challenge! In Era, Firemaw was widely agreed upon to be the hardest boss in the instance. The hardest boss crown might be contested in SoD - but regardless, Firemaw is still tough.
Shadow Flame Mechanics
Many bosses in Blackwing Lair have a breath that deals Shadow Flame damage. Shadow Flame damage is special because it has a secondary effect: if a player takes Shadow Flame damage and they are not wearing an Onyxia Scale Cloak (or in SoD, alternatively wielding Suzerain), then that player will also receive a secondary DoT which will kill them.
Tanks must be sure to equip their cloaks before pulling!
Firemaw has a number of mechanics:
- Flame Buffet: Periodically, Firemaw will apply stacks of Flame Buffet to everyone in line of sight of him. Flame Buffet deals a burst of damage upon application, and increases fire damage taken by 150. This stacks, with you taking successively more damage each stack. The only way to cleanse this is to break line of sight and have it fall off after 10 seconds. Having fire resist gear will help you resist applications of Flame Buffet whenever they go out, and having enough of it will actually allow you to stay ‘in’ all the time.
- Wing Buffet: Firemaw will do a knockback in a cone in front of him, sort of like a breath. It deals a little bit of damage but more importantly, it drops threat. Tanks will need to alternate picking up the boss after each cast of Wing Buffet.
- Shadow Flame: Conal breath in front of Firemaw, in the direction of whoever is currently tanking him. See Shadow Flame note above. Defensive CDs (both internal and external) and Priest barriers will help tanks survive.
In SoD, there’s a new mechanic too, borrowed from SoM:
- Static Electricity: Each time you take damage (melees on tanks, but for most raiders this occurs with Flame Buffet stacks), you will also receive a stack of Static Electricity. When you have 10 stacks of Static Electricity you will ‘discharge’ your accumulated stacks, damaging nearby players. Once you’ve reached 8 or so, you should run to the designated “discharge zone”, which is still within sight of Firemaw to ensure you receive 10 stacks and ‘discharge’ while not bombing the raid. The damage dealt by this discharge is survivable, but it can cascade if too many bombs hit too many players at once. Static charges do not go away when Flame Buffet stacks are dropped.
Positioning
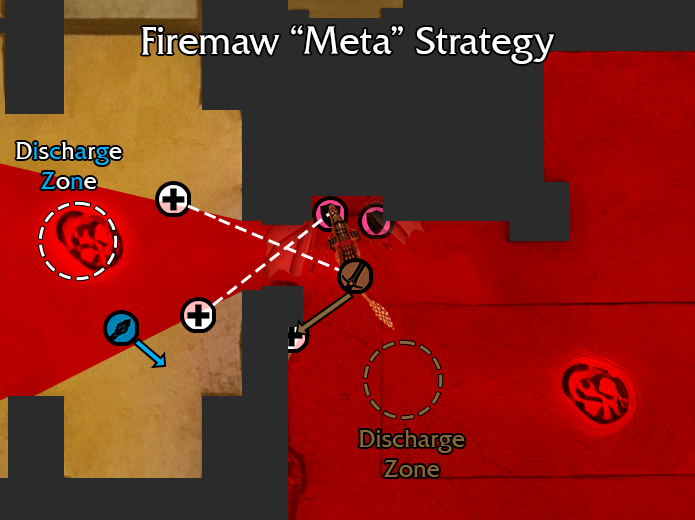
There are two strategies for positioning on this fight. The first one is what most guides I’ve seen online call for - Firemaw is positioned in his original room, tucked into the gateway leading down to the lower suppression room, with the tank backed into that corner. Melee then sit behind him, using a nearby pillar to drop buffet stacks as needed. Healers and ranged all stay in Broodlord’s room and use the pillars on the left and right of the doorway to break line of sight as needed. Ranged and the tank+ranged healers share one discharge zone, while melee and the melee healer have their own in Firemaw’s room.
The other strategy is the one my guild, <Odyssey>, used in Season of Mastery. Firemaw is tanked directly in the doorway between his and Broodlord’s room, with the tank and assigned tank healer staying in Firemaw’s room. Melee then is positioned behind Firemaw, in the doorway, and retreats around the corner into Broodlord’s room to drop buffet stacks, and shares one big discharge zone with the ranged for static charges.
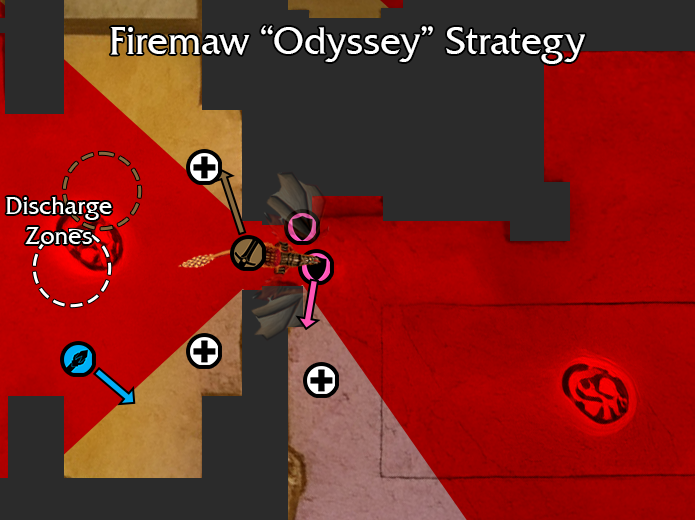
The upside to the second strat is that healers have a bit of an easier time with positioning, with ranged and melee healers being able to take over for each other as needed, whereas with the first strat, ranged healers cannot easily pivot to heal melee if a static bomb goes off in their DPS zone. Also with the first strat, the tank healer is in a really tight position, prone to breaking LoS during each taunt swap - whereas with the Odyssey strat, the tank healer has the easiest job in the world. The Odyssey strat also allows healers to easily cover melee taking damage in the discharge zone, whereas the meta strat means only the melee healer can cover them.
In both strategies, the offtank should stand perpendicular to Firemaw, and whenever Firemaw is about to cast Wing Buffet, have the OT taunt them so the Wing Buffet is directed at them and doesn’t reset the MT’s threat.
Be sure to run decent fire resist for this fight! Paladins should all be on Fire Aura, Shamans should have Fire Totems active, and you should have your Ony Cloaks enchanted with the Hydraxian +30 FR enchant. The more FR you have, the less frequently you’ll receive Flame Buffet and Static Electricity stacks, which means the less frequently you’ll have to run out of combat and wait for stacks to drop.
MTs should run as much FR as they can within reason, since it’s hard for them to reset Flame Buffet stacks, but with the Odyssey strat you can have the OT hold threat temporarily in the MT’s position while the MT runs around the corner to drop stacks. Just ensure you do this outside of any Wing Buffet window or things could get messy.
10 seconds into the fight, Firemaw will cast Fulmination, which is a raid-wide 500 nature damage. From that point on, he’ll cast it again every 30 seconds. Just heal through it. Don’t forget that since this is raid damage, this is another way (alongside Flame Buffet) to gain Static charges.