C’Thun
Last updated: 7/29/26
C’Thun is a massive eldritch horror that is permanently positioned in the middle of his arena.
Do not the c’thussy.
He will pull if anyone passes by the entrance to his room, and he cannot be reset.
Positioning
Positioning is, by far, the most important part of this fight. Thankfully, with only 20 players, you can divide into quadrants instead of octants (for 40 players). You will need to evenly distribute players throughout the room, ensuring that each quadrant has a healer and an even spread of melee and ranged.
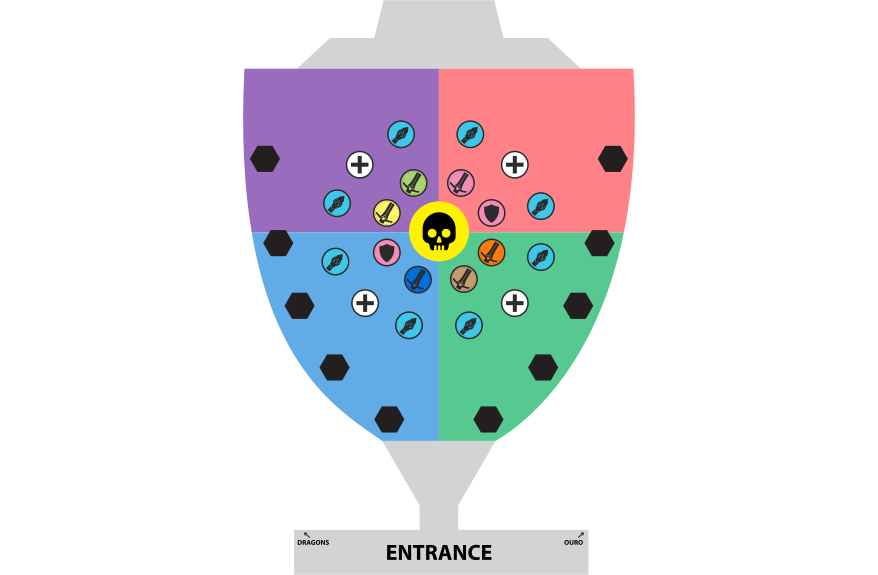
No matter what, there are only 8 positions available for melee. If you have more melee + tanks than 8 players, then some will need to pixel stack on top of each other.
You should ensure that tanks are distributed evenly - if you have 2, they should be across from each other, and if you have more, they should be distributed evenly as well. This ensures at least one is already in position at the start of Phase 2, regardless of how many rotations occur.
Additional ranged and heals may spread loosely throughout the room, but must stay at least 10 yards apart from other players.
Due to how most group heal spells work in SoD, you may wish to arrange groups according to these quadrants, to ensure healers can cast a single AoE heal spell to heal all players their quadrant. If you don’t do this, you will likely have multiple deaths in Phase 1.
Phase 1
During this phase, the boss is in a weaker state, called Eye of C’Thun. He may be damaged normally. The phase transitions when Eye of C’Thun reaches 0 health.
Eye Beam
This is the reason everyone must be spread out. Eye Beam is randomly cast at players and will bounce to nearby (10yd) players; each additional jump will double its damage. Ideally, this only hits a single player at a time for a low amount of damage. C’Thun only casts this in Phase 1, and it cannot be interrupted.
Dark Glare
When the Eye of C’Thun casts Dark Glare, there will be a giant red laser beam that divides the raid. The beam will pivot either clockwise or counter-clockwise around the room. It will complete half a rotation before it stops casting. The raid will need to orbit around the room relative to C’Thun as this occurs, keeping spread the whole time. As soon as Dark Glare finishes casting, the Eye will likely cast an Eye Beam, testing your spread.
Each Dark Glare cast will rotate players around the room by 180°. That means if you began in the northwest corner, after the first Dark Glare cast, you will now be in the southeast corner. This mechanic does not continue after Phase 1.
Small Eye Tentacles
Small Eye Tentacles will periodically spawn throughout the fight, centered around C’Thun. During Phase 1, melee DPS should switch to them immediately, since they spawn directly next to the melee stack positions. These cast Mind Flay on random players and can quickly deal a lot of damage. These continue spawning during Phase 2.
Small Claw Tentacles
Small Claw Tentacles will randomly spawn around the arena during Phase 1. Tanks should pick these up immediately, or else they will cast Ground Rupture and hurt nearby players. Ranged DPS should prioritize these over C’Thun. These stop spawning after Phase 1.
Phase 2
When you enter Phase 2, all players should rotate to fight C’Thun from the entrance to the arena, which ensures the new adds spawn on top of everybody for easy killing.
There are a number of changes that occur in Phase 2:
Carapace of C’Thun
During Phase 2, C’Thun gains a shield that gives him 99% resistance to damage. While this shield is up, all DPS should be focused on other targets. When Carapace is down, C’Thun is stunned, and he cannot cast abilities or spawn additional tentacles until the vulnerability ends.
Giant Eye Tentacle
These spawn periodically in Phase 2. These must be tanked or they cast Ground Rupture, hurting all nearby players. Rather than casting Mind Flay, they will cast Eye Beam, just like C’Thun did in Phase 1. Melee should switch to these whenever they are up, as Eye Beam needs to be constantly interrupted.
Giant Claw Tentacle
These spawn periodically in Phase 2. These must be tanked or they cast Ground Rupture, hurting all nearby players. These are the lowest priority target, but still need to be killed.
Small Eye Tentacles
These continue spawning in Phase 2, but they should now be focused by ranged players since the melee will be out of position and busy with the other tentacles.
Kill Target Priority
- When C’Thun is invulnerable: Small Eyes > Giant Eyes > Giant Claws
- When C’Thun is vulnerable: Small Eyes > Giant Eyes > C’Thun > Giant Claws
C’Thun’s Stomach
During Phase 2, C’Thun will periodically swallow random players, sending them to a separate stomach room.
Within this room are two Flesh Tentacles which must be killed. When both Flesh Tentacles die, C’Thun’s Carapace will drop for around 45 seconds. Between these tentacles is the launch pad, which serves as your exit; it will launch you into the air, up and out of C’Thun’s mouth.
While inside the stomach, players will begin accumulating Digestive Acid stacks every 5 seconds, which is a Nature DoT. As these stacks increase they will begin taking more and more damage. Casters should only stay inside the stomach for a few stacks, dealing damage as they’re able before they leave. Melee can typically stay until they reach 7-8 stacks. If a healer gets sent into the stomach, they can heal other players inside it, allowing those DPS to stay in the stomach for a little bit longer.
During Phase 2, the raid leader will need to call out whether to “push” the stomach tentacles, or leave them alive. Pushing (killing) them will trigger a vulnerability period where Carapace drops, but you should not do this while there are still giant tentacles (especially Eyes) alive. You should aim to trigger a vulnerability phase right as you get all the tentacles down, before additional ones spawn.
If you are dead in the stomach when C’Thun dies, you will need to release and run back into the instance.
On this fight’s hard mode, your raid will have the following additional debuffs:
Curse of Despair (Rank 3): Raid-wide DoT (curse).
Curse of Decay (Rank 3): Reduces max health of all players by 10%.
Curse of Madness (Rank 3): All players deal 15% more damage and healing, but receive 25% more damage.